changeset:   18:090d339bcbc0
tag:         tip
user:        Peter van Dijk <peter.van.dijk@netherlabs.nl>
date:        Fri Oct 25 08:22:27 2013 -0400
summary:     updates
If you follow this HOWTO, at the end of it you'll have:
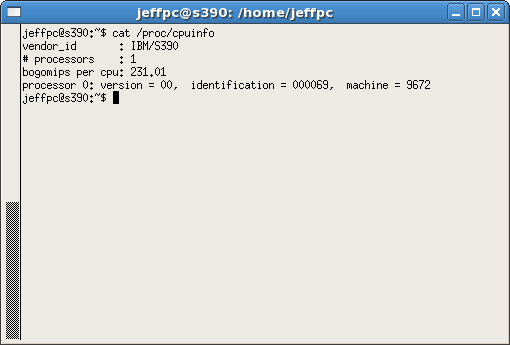
Yes, that's debian running on an IBM System/390 box. Very emulated one, but still wonderful enough to keep around :)
The following howto assumes, that you know at least a little bit of:
The following software is required:
On my laptop (3.06GHz Pentium 4, 1GB RAM) the install take about 3 hours (2 hours for minimal system, and about an hour extra for what Debian considers some useful packages). The minimal install downloads about 66MB, and the additional software is about 42MB on top of that.
First, let's set up a place to do all the work:
$ mkdir zlinux
$ cd zlinux
$ mkdir dasd rdr prt
Wonderful. Now, let's get the images from which we will IPL (IPL stands for Initial Program Load, and it is effectively the "boot" process).
There are a number of distros that support S/390 hardware, but only one of them is worth trying on any platform - Debian :)
So, point your browser to the mirror nearest you, navigate to this rather long path:
/debian/dists/stable/main/installer-s390/current/images/generic/and grab these files:
initrd.debian
kernel.debian
parmfile.debian
I used Debian 4.0r2 to write this howto, but a newer version should work just as well.
Peter van Dijk reports:
Save them into the
rdrdirectory. The first two files' names gives away their contents - the first is an initrd, and the second is the kernel image itself. The last file contains the kernel command line options, which on systems like i386, you specify via a keyboard to the bootloader.
Any serious emulator allows you to specify the exact system configuration via a config file. Hercules is no exception. Save the following in
zlinux/s390.cnfor similar.
CPUSERIAL 000069        # CPU serial number
CPUMODEL  9672          # CPU model number
MAINSIZE  256           # Main storage size in megabytes
XPNDSIZE  0             # Expanded storage size in megabytes
CNSLPORT  3270          # TCP port number to which consoles connect
NUMCPU    2             # Number of CPUs
LOADPARM  0120....      # IPL parameter
OSTAILOR  LINUX         # OS tailoring
PANRATE   SLOW          # Panel refresh rate (SLOW, FAST)
ARCHMODE  ESAME         # Architecture mode ESA/390 or ESAME

# .-----------------------Device number
# |     .-----------------Device type
# |     |       .---------File name and parameters
# |     |       |
# V     V       V
#---    ----    --------------------

# console
001F    3270

# terminal
0009    3215

# reader
000C    3505    ./rdr/kernel.debian ./rdr/parmfile.debian ./rdr/initrd.debian autopad eof

# printer
000E    1403    ./prt/print00e.txt crlf

# dasd
0120    3390    ./dasd/3390.LINUX.0120
0121    3390    ./dasd/3390.LINUX.0121

# tape
0581    3420

# network                               s390     realbox
0A00,0A01  CTCI -n /dev/net/tun -t 1500 10.1.1.2 10.1.1.1
The top part of the config file specifies the processor features, and the bottom part specifies devices attached. Each device has a device number (leftmost column), a device type (middle column), and optionally arguments (right columns). I'd suggest you read a bit of information from the Hercules website or many other websites dedicated to the IBM System/390 and zSeries architectures. It is just far too much to explain here.
One thing to note, if your real hardware has only one core, you may want to change the NUMCPU to 1. Peter van Dijk reports that NUMCPU=4 causes kernel stalls with Debian 7/s390x.
Another thing you may want to change is the last line, which defines a Channel To Channel (CTC, see internet for description of what Channels are) device which will be used as a network bridge to allow the virtual machine access to the LAN and therefore the internet. The first IP address is the address that the virtual machine running s/390 linux will use, and the second address is one which will be used by the real hardware. This means, that the real box will have two IP addresses. Go ahead, and use any valid addresses in the non-routable range 10.0.0.0/8 or 192.168.0.0/16 (this is not a networking guide, so go to the net if you need help with it). Once we start the emulator, it will set up a tun/tap device on the real box which will be connected to the ctc device within S/390.
Next step is to generate the DASD devices. DASD stands for Direct Access Storage Device, and it is the S/390 name for very beefed up versions of "disks". For details on how DASD works, see the internet.
We defined two so called packs. The first, device number 120, will contain the root file system, and the second, device 121, will contain your home directory. Execute the following two commands in the dasd directory. Each will create a file about 2.7GB in size.
$ dasdinit -lfs -linux 3390.LINUX.0120 3390-3 LIN120  # /
$ dasdinit -lfs -linux 3390.LINUX.0121 3390-3 LIN121  # /home
If you prefer a single /, leave out the second command (and the related line in s390.conf). You can add another argument to specify the size. 8000 will give you around 6.4 GB.
Alternatively, if you want to save disk space at the expense of some run-time overhead, you can use zlib or bz2 compressed DASDs by using the -z or -bz2 arguments, respectively. For example,
$ dasdinit -z -lfs -linux 3390.LINUX.0120 3390-3 LIN120  # /
$ dasdinit -z -lfs -linux 3390.LINUX.0121 3390-3 LIN121  # /home
Congratulations! You are ready to start the emulator now. Since, the default configuration on any reasonable Linux box will require you to be root to set up tun/tap connections, let's start hercules as root with the config file:
# hercules -f s390.cnf
You should see something that looks like this:
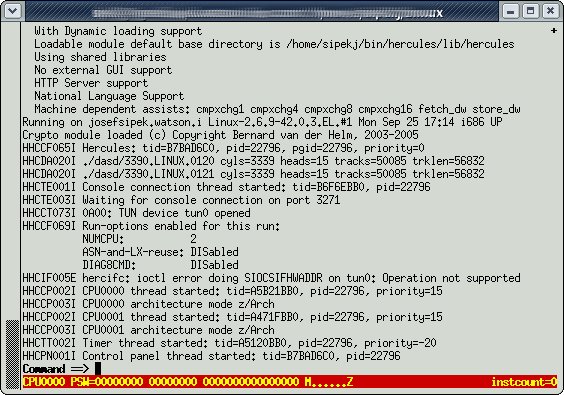
It is safe to ignore the "tun0: Operation not supported" message.
Now, by default, the emulated network interface is not routed through, the following commands will take care of things if you use 10.1.1.x IP addresses as I do:
# iptables -t nat -A POSTROUTING -o eth0 -s 10.1.1.0/24 -j MASQUERADE
# iptables -A FORWARD -s 10.1.1.0/24 -j ACCEPT
# iptables -A FORWARD -d 10.1.1.0/24 -j ACCEPT
# echo 1 > /proc/sys/net/ipv4/ip_forward
# echo 1 > /proc/sys/net/ipv4/conf/all/proxy_arp
If for more information about the networking, look at any number of the networking guides on the internet.
Ok, now it is time to load the program - time to IPL! In Hercules, type
ipl cand press enter. This tells the emulator to start executing the program from device
000Cwhich happens to be the card reader!
Now you should see the Linux kernel booting - the installer to be exact :)
Wait until you see:
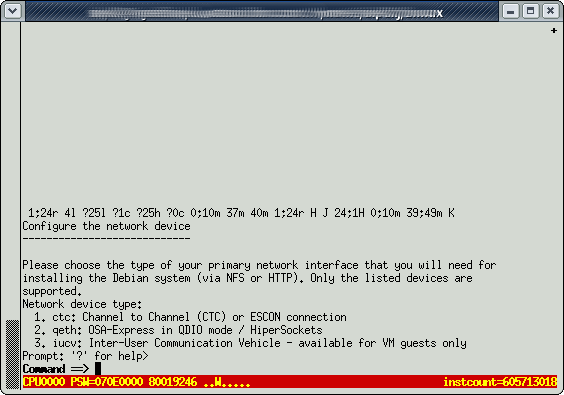
Wonderful! The installer is asking us to select the type of the network interface. Select ctc (Channel to Channel - for description of what exactly channels are, see plenty of other documentation on the subject) by typing:
.1Note, that the dot is important. Without the dot, anything you type will be interpreted by Hercules (the emulator). The dot tells Hercules to send the remainder of the string to the emulated system.
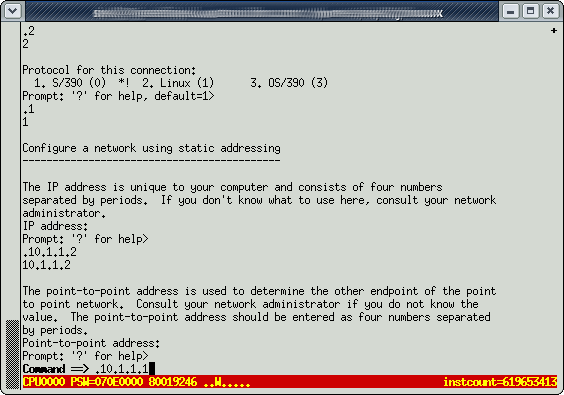
Now, you have to define the end-points for this virtual network interface: Select read ctc device:
.1
Select write ctc device:
.2
Select protocol - s/390:
.1
Now, enter the IP addresses for the end-points (must match the IP addresses in the .cnf file).
Enter s390 box IP:
.10.1.1.2
Enter host box IP:
.10.1.1.1
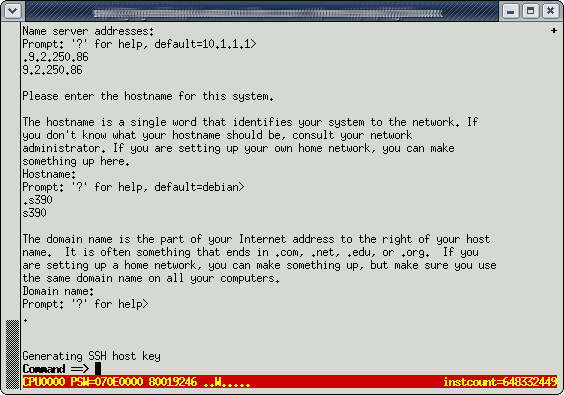
Enter DNS server IP - choose the same your non-virtual system uses (see /etc/resolv.conf):
.x.x.x.x
Enter hostname:
.s390
Enter your domain name; to specify no domain name, you need to enter the empty string, but due to the way Hercules handles input, you will need to enter a dot followed by a space):
.home
Alright! Now, just sit back, and wait until your system generates a SSH key. This will take a few minutes.
Before long, the installer will ask you for a password for the remainder of the install process, just enter anything:
.foo
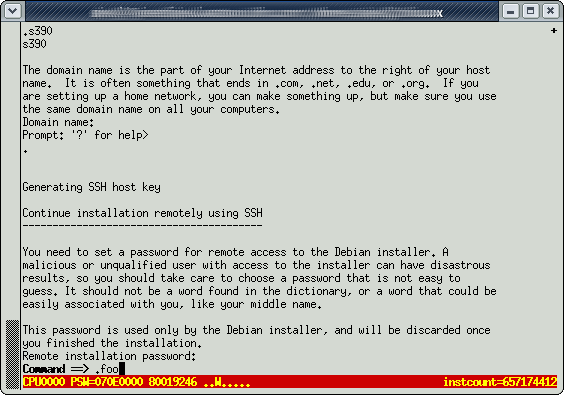
Re-enter it to make sure. Yes, you can see the password in plain-text, but the installer wants it anyway :)
When you see
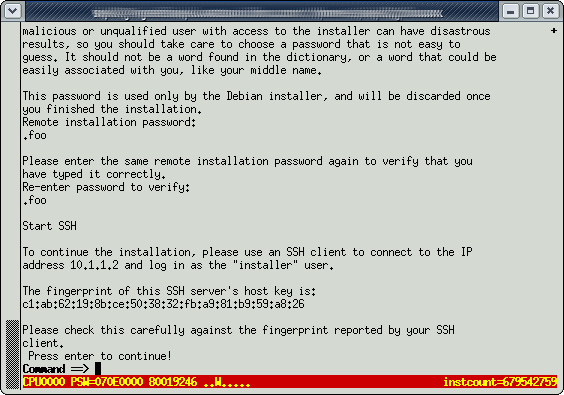
you'll know you are on the right track! Now, open a new terminal, and ssh into installer@10.1.1.2, if everything you did was right, ssh will ask you for a password.
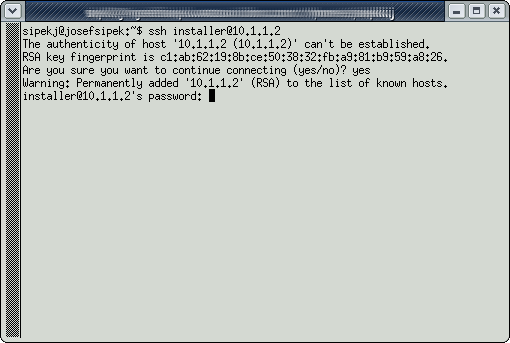
Remember that you are using ssh which encrypts everything, and therefore things will be slow.
Once you enter the right password, a more familiar looking Debian installer will start up:
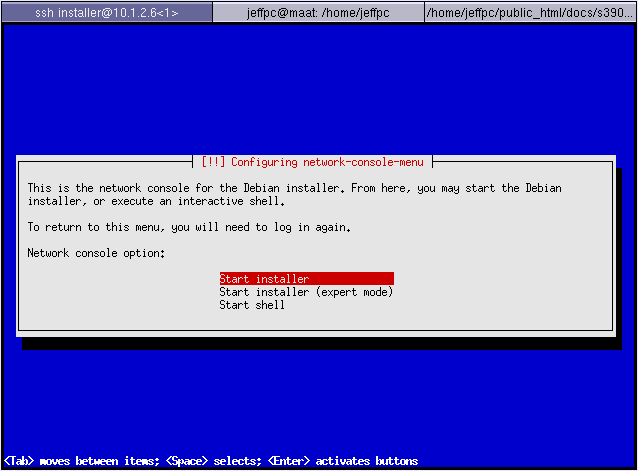
Select: start installer
Select your country and a suitable mirror.
Leave the proxy information blank unless you have some special proxy setup.
Now you should see:
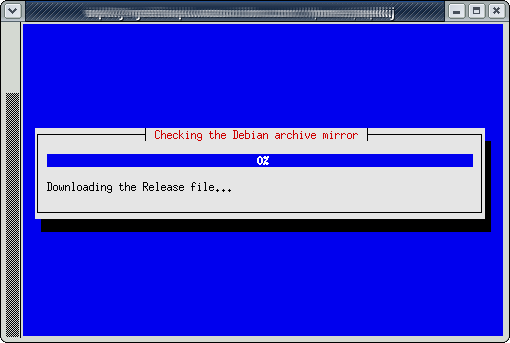 ,
,
and shortly after, several installation components will get downloaded
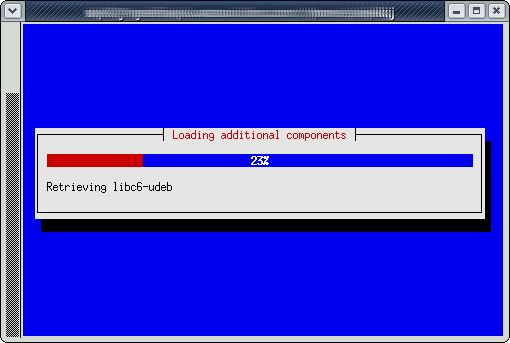
Just be patient and wait...or maybe go get some non-caffeinated beverage, because chances are you've been sipping on that coffee/tea since the beginning of the installation. :)
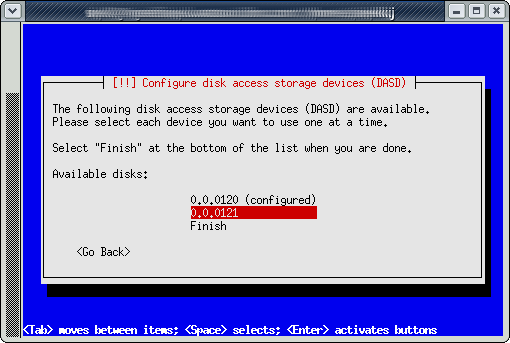
Once everything is downloaded, you'll be presented with a config screen for DASD:
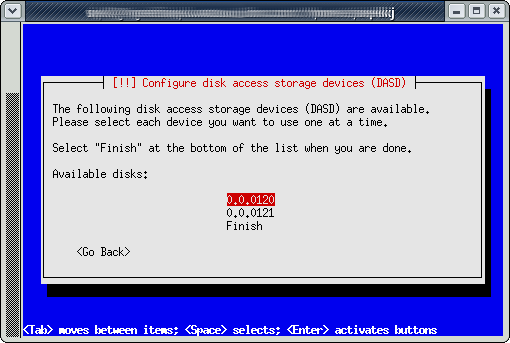
DASD is "Direct Access Storage Device" - yes Debian calls it "Disk access storage device" oh well, they are wrong.
You'll see two DASD packs, 0.0.0120 and 0.0.0121. The first will be used for the system root and the second for your /home.
Select the first, on the next screen, you'll be asked if you want to format it, say no. You'll get back to the DASD menu:
 ,
,
Select the other device (121), and do not format it. (If you happen to say yes to formating, all that'll do it waste a lot of your time doing IO. However, nothing bad will happen.)
Once both volumes are configured, select "Finish".
The following screen
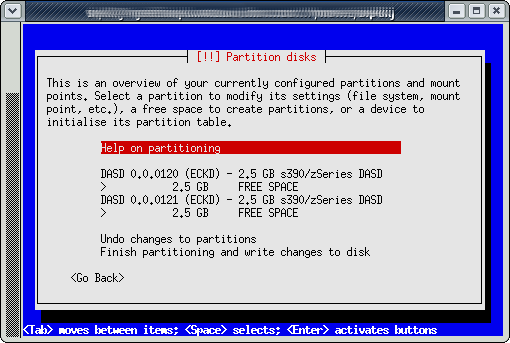
should seem familiar to anyone who installed Debian before and chose manual partitioning. You want to create one partition on each DASD. For filesystem type, feel free to chose whatever filesystem you prefer. Each has their advantages. I tend to go with XFS, but because there is a bug in the Debian installer, it is not very easy to get XFS going...so for the sake of simplicity, I went with ext3.
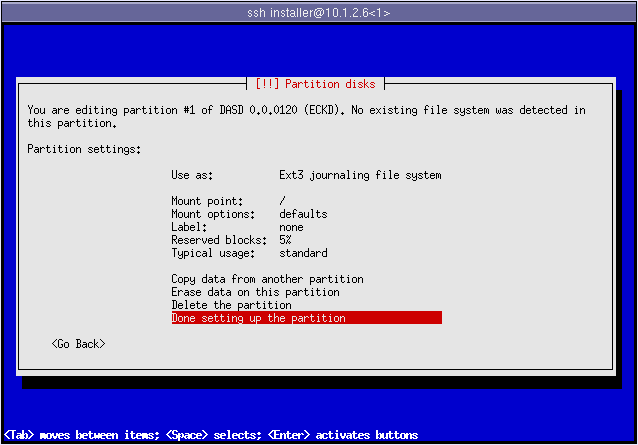

Now, the installer will ask you if you want to go back to the partitioning menu because you didn't define any swap. It's up to you, I tend to go without swap.
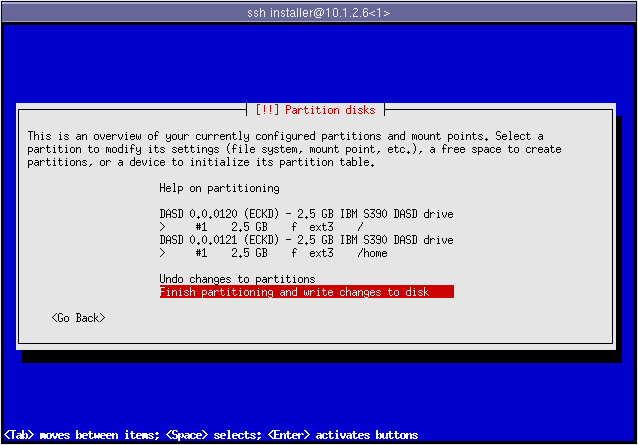
Confirm the changes:
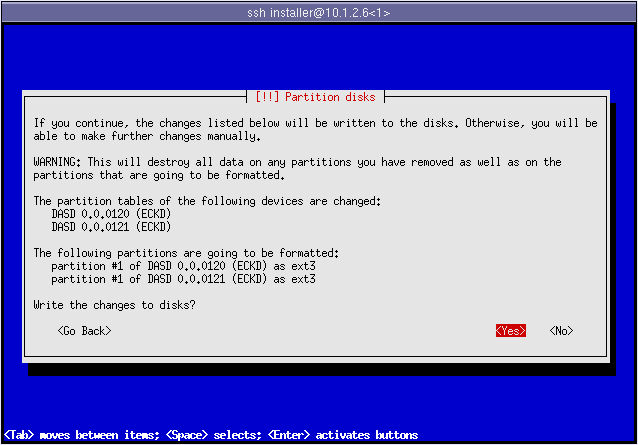
Now the ext3 filesystems will get created on the DASD packs.
Since we didn't define any swap space, the installer will ask us if we want to go back to the partitioner, we don't want to go back because we know what we are doing ;)
The next few questions have to do with locale (country & timezone), so just answer them to the best of your ability.
The next question is the password for root - use something you'll remember :)
Following is a series of questions about creating a new user (non-root) account; so create yourself an account. Once you finish, the installer will spend quite some time installing all the packages. At the end, you will be asked if you want to reboot your computer. Say that you do. When the system stops, in the Hercules console, enter
ipl 120. Now, wait a bit, and after not too long, try to ssh into username@10.1.1.2 (where username is what you entered during the non-root user account creation). You should get a shell. It is Linux. It is a mainframe. It is yours. Have fun! :)
When you've had enough fun for the day, just shutdown the Linux system (halt, shutdown, whatever way you prefer), and then run
quitin the Hercules window.
If you decide to play with a system you already installed, start Hercules:
# hercules -f s390.cnfSet up iptables:
# iptables -t nat -A POSTROUTING -o eth0 -s 10.1.1.0/24 -j MASQUERADE
# iptables -A FORWARD -s 10.1.1.0/24 -j ACCEPT
# iptables -A FORWARD -d 10.1.1.0/24 -j ACCEPT
# echo 1 > /proc/sys/net/ipv4/ip_forward
# echo 1 > /proc/sys/net/ipv4/conf/all/proxy_arp
and IPL from device 120 (the system DASD):
ipl 120When Linux starts up, you should be able to SSH in without any problems.
The system you now have is running with a 31-bit kernel. If you want a 64-bit kernel, simply run:
# aptitude install kernel-image-2.6-s390xThis will install the right image, and set up zIPL (the bootloader) to do the right thing. The original kernel image will remain installed, and you can select it in the bootloader (right after you issue ipl on the Hercules console). This step appears to be unnecessary on Debian 6 or up, even when installing from s390. YMMV.
I hope this HOWTO helped you get started with a mainframe of your own. I tried to be as accurate and specific with the details where I thought it was necessary - the S/390 specific parts. If you have any suggestions, or comments (content, spelling, etc.) feel free to contact me via email: jeffpc@josefsipek.net.
changeset:   18:090d339bcbc0
tag:         tip
user:        Peter van Dijk <peter.van.dijk@netherlabs.nl>
date:        Fri Oct 25 08:22:27 2013 -0400
summary:     updates

changeset:   17:ca14464cc7c4
user:        Josef 'Jeff' Sipek <jeffpc@josefsipek.net>
date:        Fri Dec 25 20:30:14 2009 -0500
summary:     herc-s390: fixup typo

changeset:   16:7718d9e7be23
user:        Josef 'Jeff' Sipek <jeffpc@josefsipek.net>
date:        Fri Dec 25 17:37:23 2009 -0500
summary:     herc-s390: mention compressed DASDs, suggest ext3 instead of ext2

changeset:   13:82b4c40a4f5c
user:        Josef 'Jeff' Sipek <jeffpc@josefsipek.net>
date:        Wed Apr 29 21:44:26 2009 -0400
summary:     herc-s390: fixed a typo pointed out by Peter Vels

changeset:   10:1d96f0b77f23
user:        Josef 'Jeff' Sipek <jeffpc@josefsipek.net>
date:        Sun Aug 31 18:56:26 2008 -0400
summary:     revamp of the build system + zvm-centos4 howto begining